Introduction
Recently I’ve been working on installing Apache Airavata in a VirtualBox VM running on my laptop using our “standalone” Ansible installation settings. The goal is to have a locally running instance of Airavata that I can connect to when developing the Airavata Django Portal which I’ve been working on. That means I need Django running on my laptop to be able to access the VM (host-to-guest access) and the VM does need to be able to access the internet (guest-to-internet access) since the Ansible playbooks that are executed against the VM download and install software from the internet.
It turns out that getting this set up is not so trivial, but also, it’s not that hard once you know what VirtualBox provides and how to configure it. In summary, the approach I’ll give here is to create a VirtualBox VM:
- with the default NAT network adapter (for internet access)
- and then add a host-only network adapter and configure the VM with a static IP address (for host-to-guest access)
A quick word about VirtualBox networking modes. You can read all about the various networking modes here but here’s a quick summary:
- NAT – the networking mode of the default network adapter when you create a new VM. This gives internet access but applications running on the host can’t make network connections to the VM.
- Bridged – with this mode VirtualBox uses a special driver for the host’s physical network interface to create a virtual network interface for the VM. The VM gets an IP on the same network that the host is physically connected to. Host-to-guest communication and internet access are available.
- Host-only – with this mode VirtualBox creates a virtual network that the host and the VMs are connected to. This allows host-to-guest communication but this virtual network has no access to the internet.
Now you might be wondering, why not just use a bridged network adapter? Well, you can, but there is one substantial downside. Whenever the network the host is connected to changes, the IP address of the VM will change. This is exacerbated in my case by the fact that I exclusively use wireless networks on my laptop, so my network is regularly changing. Also, I really need a static IP address for the VM to configure the Ansible scripts and because part of the process is to generate a self-signed SSL certificate for the VM’s IP address. But, if you’re using a wired workstation or you don’t have a lot of configuration dependent on the VM’s IP address, bridged networking might be a good solution to get you both internet access and host-to-guest networking.
Installing CentOS 7
Creating a CentOS 7 VM is covered well in other places (I used Jeramy Singleton’s guide), so I won’t cover all of the steps here. But here are some quick pointers:
- Set the type of the VM to Linux and the version to Red Hat (64-bit)
- Download a minimal ISO from https://www.centos.org/download/
- Log in as root and change the working directory to
/etc/sysconfig/network-scripts/and edit theifcfg-enp0s3config file and setONBOOTtoyes. Then reboot the VM to get network access.
Also note that whereas in Jeramy Singleton’s instructions he has you create a port forward (2222->22) to be able to SSH into the VM, in the following we’ll add a host-only network instead and use that IP address to SSH into the VM on the standard port 22.
Configuring host-only network
First, make sure that there is a host-only network to connect to. In my case, a default one was already created, called vboxnet0. To check if you already have one, start VirtualBox and then click on the Global Tools button and make sure you are on the Host Manager Network tab.
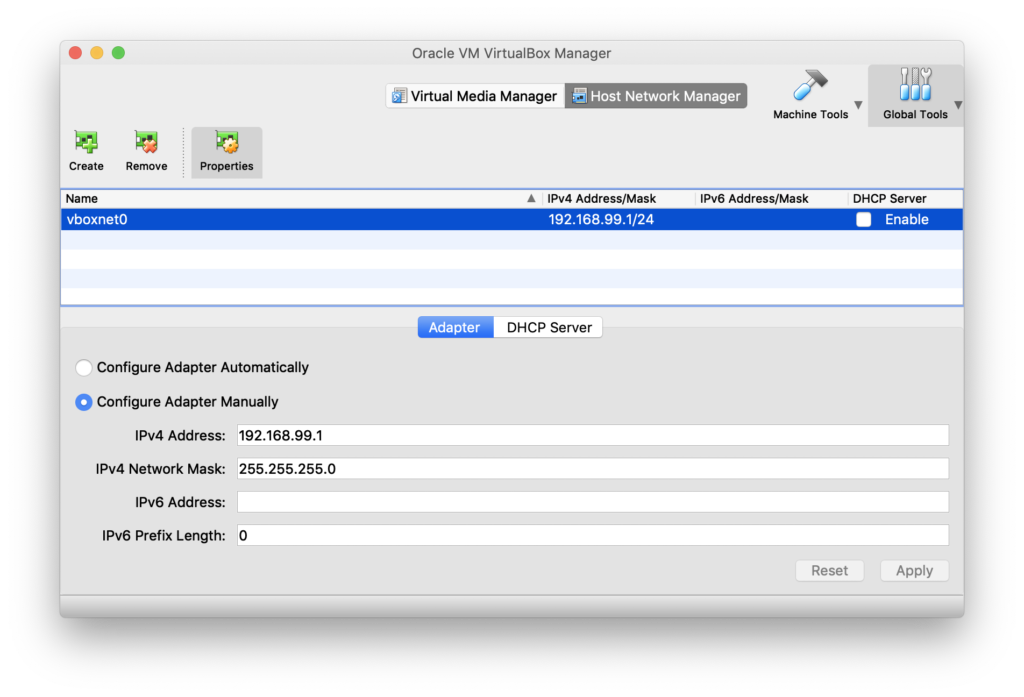
Take note of the IP Address of the network and the network mask. In the screenshot above, the IP Address is 192.168.99.1 with network mask of 255.255.255.0 which means I can assign IP addresses 192.168.99.2-254 statically. I’ve disabled the DHCP server since I’ll assign IP addresses statically, but in theory you utilize static and dynamic IP assignment (if you do that note that the DHCP server will hand out IP addresses from 100-254 by default, so don’t use those).
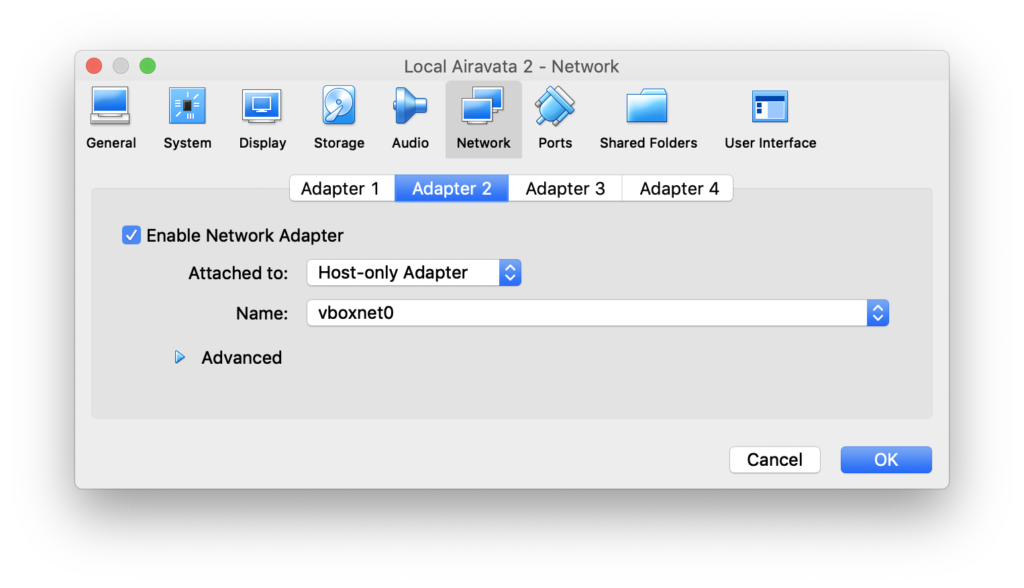
Now add a host-only network adapter to the VM. First, make sure that the VM is shut down. Next, in the VirtualBox app select the VM and click on the Settings button. Click on the Network tab. Adapter 1 should be your NAT adapter. Click on the Adapter 2 subtab, select Host-only Adapter and the name of the host-only network (vboxnet0 in this case).
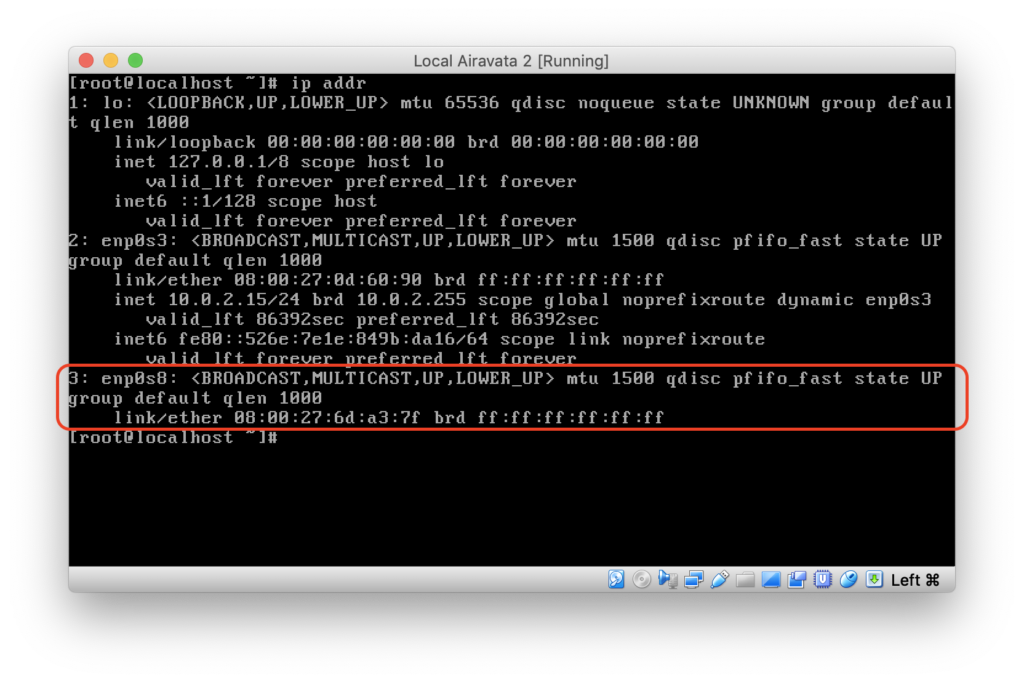
Click OK and start up the VM. Log in as root through VirtualBox console. Run
$ ip addr
to find the name of the host-only network interface. In my case it was called enp0s8.
Create a file called ifcfg-enp0s8 in /etc/sysconfig/network-scripts/ and give it the following contents:
DEVICE=enp0s8
BOOTPROTO=static
ONBOOT=yes
IPADDR=192.168.99.10
NETMASK=255.255.255.0
Where NETMASK should match the settings for your host-only network as obtained above and IPADDR should be an available IP address in the host-only network (again, typically in 2-254 range).
Now run
$ systemctl restart network
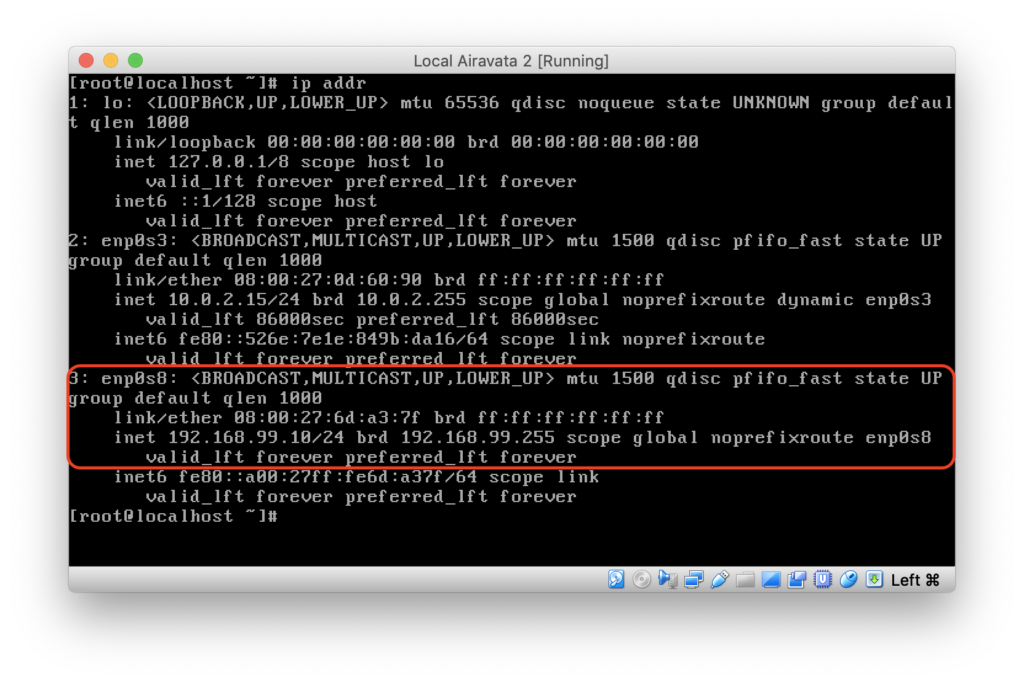
Now when you run
$ ip addr
you should see the IP address you configured in the ifcfg-enp0s8
You should now be able to SSH to the VM from the host OS:
(host OS)
$ ssh root@192.168.99.10
You can now connect applications running on the host OS to network services running on the VM via the host-only network and the VM can also connect to the wider internet via the NAT interface.
Resources
- Aaron Kili’s post on adding a host-only network adapter was very helpful. He also has instructions on how to configure a static IP on Debian-based distributions.
- Red Hat Interface Configuration Files reference
- Install a CentOS 7 Minimal Virtual Machine with VirtualBox
Great article, thanks for sharing this.
Thanks! I had a similar problem and was previously using bridged network but had to make config changes whenever I changed networks. A separate NAT and Host-only adapter solves everything.
Thank you Marcus Christie for sharing this valuable information.
Two years later, I had a couple of issues on Oracle Linux 8 (which is similar to CentOS and RedHat Enterprise 7/8). One I was able to resolve; still working on the other one. In the meantime, I will have to struggle with a Bridged connection.
First, the system created its own script for my Host-Only connection in /etc/sysconfig/network-scripts. I couldn’t get the network connected because the script you suggested contained a setting that conflicted. In the system-generated script, which contained several settings, I had to change the BOOTPROTO from “dhcp” to “static,” then add the IPADDR and NETMASK settings as suggested and reboot the VM (“systemctl restart network” didn’t work for me) to get the network active.
The second, more challenging issue is that I can’t ssh in after successfully configuring the network. SSH returns a “connection refused on port 22” error. It isn’t an issue with the firewall, and “systemctl status sshd” shows the service remains active. Turning off the Host-Only adaptor and going back to a bridged connection brings SSH back online and functional.
Has anyone else had this issue?
Worked like a charm! Thanks much! Was working with some Oracle training and was getting tired of having to switch my IP all of the time on the bridged adapter.
Thank you, worked flawlessly! Just a small suggestion though – maybe add a note that the way one can identify the specific interface that maps to the “Host-only” interface can be identified using its MAC address (as shown in the VirtualBox Network settings and in the output of
ip addr).I use NAT almost exclusively. Then, under “Advanced”, I select VB’s ‘Port Forwarding’ to make the VM accessible. Example, for a CentOS 7.9 VM, I’ll set “Host Port” to 7900, and “Guest Port” to 22. Then, a ~/.ssh/config setting that specifies the port, like:
Host centos79 c79
HostName 127.0.0.1
Port 7900
User myuser
IdentityFile ~/.ssh/myidentity_file
PubkeyAuthentication yes
StrictHostKeyChecking no
Then, I can: ssh c79
And login automatically.
Works beautifully.
This is a great solution! Works for every scenario and linux distros! Thanks!
Unfortunately this solution does not work on Oracle Linux 8. There is no ‘systemctl restart network’ command. Running a similar command ‘nmcli connection reload’ doesn’t do anything.
Hi Marcus, thanks a lot for the guide. Managed to get it done from my end, but facing a hiccup here where i can’t establish a connection to certain ports between the VMs.
Telnet to the host-only IP through port 22 is fine though. I tried to adjust the firewalld rules and restarting the service.. does not seem to help either. Anything i am missing? Appreciate any insight. Thanks