Creating and using Vue.js web components

It’s pretty easy to create a web component with Vue.js and then consume that web component in a Vue.js app. I’m interested in this as a way to plug in custom user interfaces in the Airavata Django Portal, specifically custom experiment input editors. Using web components as the plugin mechanism allows extensions to be written using any or no framework. But to build a proof-of-concept I decided to build the web component using Vue.js

vue-cli makes it easy to create a Web Component build of a Vue.js component. Just run

vue-cli-service build --target wc src/components/MyComponent.vue

This creates a output files in dist/ called my-component.js and my-component.min.js. It also creates a demo.html file that demonstrates how to load and use the web component. To see this in action, let’s create a simple "Hello World" component and then build and load it.

First, install vue-cli. Then run the following (note: the following assumes yarn is installed, but you can use npm instead):

vue create hello-world
cd hello-world
yarn build --target wc src/components/HelloWorld.vue

Now open dist/demo.html in a web browser. On macOS you can do:

open dist/demo.html

You should see the vue-cli default Vue component boilerplate.

demo.html looks like this:

<meta charset="utf-8">
<title>hello-world demo</title>
<script src="https://unpkg.com/vue"></script>
<script src="./hello-world.js"></script>


<hello-world></hello-world>

This loads Vue.js as a global object and the built web component script. The ./hello-world.js script registers the web component so it is immediately availble for use as shown at the bottom: <hello-world></hello-world>.

So that’s how to build a Vue.js web component and how to load it in a basic web page. But how would you load it in a Vue.js application and integrate it? There are a few things to keep in mind.

vue-cli externalizes the Vue dependency

When you load a Vue.js web component you’ll need to make it available in the global scope, that is, a property of the window object. In your Vue.js app, before you load the web component, you’ll need to do something like:

import Vue from "vue";

if (!window.Vue) {
  window.Vue = Vue;
}

Using dynamic imports

You can of course import the web component using a script tag, but I feel like in a Vue.js web component it’s more natural to use the dynamic import function.

const webComponentURL = "https://unpkg.com/..."; // or wherever it lives
import(/* webpackIgnore: true */ webComponentURL);

The /* webpackIgnore: true */ is necessary because otherwise Webpack will try to use the import statement at build time to generated an optimized, code-splitted build.

Vue.config.ignoredElements

When you reference custom elements in Vue.js templates, you need to let Vue.js know to ignore them and not expect them to be Vue.js components. Otherwise, Vue.js will generate a warning because it will appear to it that either the developer mistyped the Vue.js component name or that the component wasn’t registered.

For the Airavata Django Portal, what I’ve done is define a prefix (as a regular expression) that will be ignored ("adpf" stands for Airavata Django Portal Framework):

  Vue.config.ignoredElements = [
    // Custom input editors that have a 
    // tag name starting with "adpf-plugin-"
    // Vue will ignore and not warn about
    /^adpf-plugin-/,
  ]

Dynamically reference web component in Vue.js template

We’ve seen how to use a web component in a Vue.js template: you just use the tag name, like the demo.html example above. But how would you dynamically reference a web component? You can do that with the special ‘is’ attribute, which the Vue.js special component tag also supports.

<template>
  <component is="tagName"/>
</template>
<script>
export default {
//...
  data() {
    return {
      "tagName": "hello-world"
    }
  }
}
</script>

Handling web component events

Web component events are handled a little differently from Vue.js events. First, with Vue.js events you can emit an event with a value which will be passed as the first argument to event handler (see https://vuejs.org/v2/guide/components.html#Emitting-a-Value-With-an-Event for an example). This doesn’t quite work with web components. Instead, the emitted event will have a detail attribute which is an array of the event values. So instead of expecting the first argument to be the event value, the handler should expect the event object as the first argument and then check its detail attribute for the event value.

    webComponentValueChanged: function(e) {
      if (e.detail && e.detail.length && e.detail.length > 0) {
        this.data = e.detail[0];
      }
    }

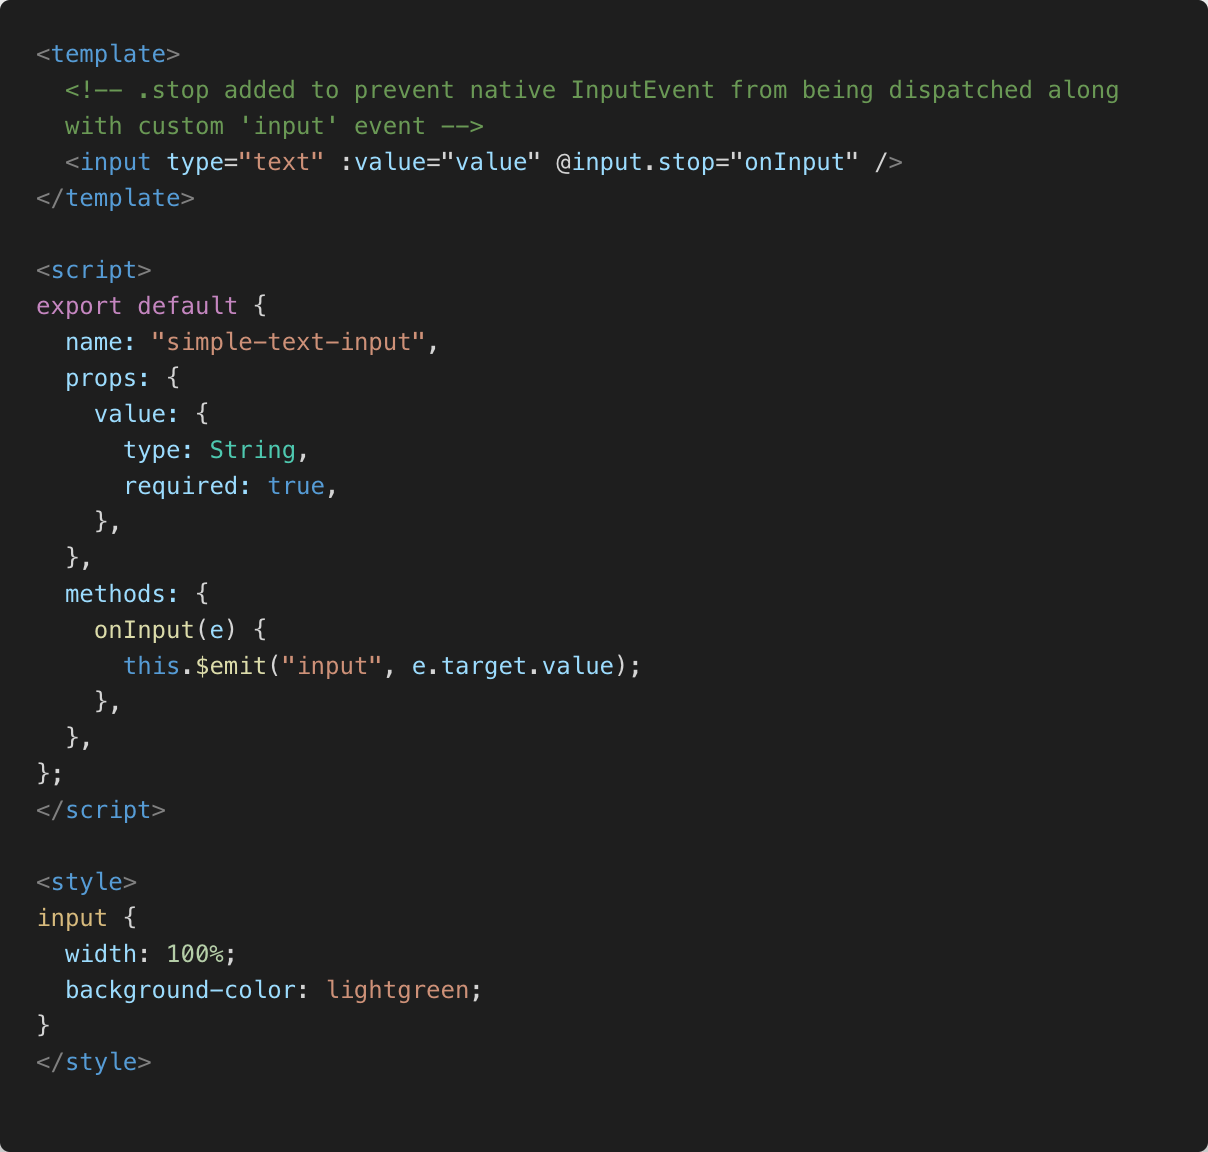
Second, and maybe I’m doing something wrong, but when I have my Vue.js component emit an "input" event, I end up getting two "input" events, one from the Vue.js component and a native "input" event. Perhaps it is more correct to say that when the Vue.js app listens for the "input" event on the web component it ends up getting the native and custom Vue.js "input" events. I was able to prevent the native "input" event with the .stop modifier.

<template>
  <!-- .stop added to prevent native InputEvent 
  from being dispatched along
  with custom 'input' event -->
  <input type="text" :value="value"
     @input.stop="onInput" />
</template>

<script>
export default {
  name: "simple-text-input",
// ...
  methods: {
    onInput(e) {
      this.$emit("input", e.target.value);
    },
  },
};
</script>

Still to do

You can see the code for the web component here: https://github.com/machristie/simple-text-input/blob/master/src/components/SimpleTextInput.vue. Here is the commit for integrating this into the Airavata Django Portal: https://github.com/apache/airavata-django-portal/commit/62e5d606e53f61207e094289607c48e747604bc3

This is a pretty basic proof-of-concept. Things I still want to do:

  • Verify the web component can be published to and loaded from a CDN or some other public registry, for example, https://unpkg.com.
  • Integrate validation by using the InputEditorMixin. (note: this is Vue.js specific but similar mixins or utilities could be developed for other frameworks.) This mixin automatically runs validation, but the custom input editor could augment this with any custom validation as required. The way we’ve designed the input editors is that the input editor components own the validation of the values, however, most of the validation is metadata driven and not usually implemented in the input editor component.
  • Unify some code in the InputEditorContainer. Essentially, as much as possible I don’t want to have two code paths, one for internal Vue components and one for web components, although as pointed out above, event handling is a little different between the two.
  • Create a higher level component to load the web components. This higher level component would use window.customElement.get(tagName) to see if the component is already loaded.
  • This is more Airavata Django Portal specific, but some input editors need to generate and/or upload an input file. I need to think about how to provide an API that web components can use to easily upload files. File input editors need to register the uploaded file and get back an identifier (called a data product URI) that is then returned as the value (as opposed to string input editors which need to edit the string value and just return the same).

Resources

COVID-19 Positivity Rate in Indiana Counties visualized with Leaflet.js

Why Positivity Rate?

According to the John Hopkins Coronavirus Resource Center, the WHO recommends that governments not proceed with reopening until the positivity rate (that is, the percentage of COVID-19 tests that come back positive) stays at 5% or lower for at least 14 days. Positivity rate is a good tool for assessing readiness to reopen because it indicates whether COVID-19 testing is being done only for those who are already sick or whether it is being used to test a wide swath of individuals to find also asymptomatic cases and thus prevent the spread of the disease.

I decided to create a map of positivity rates in Indiana counties since I hadn’t yet seen a visualization of that data at the county level. For example, the John Hopkins Coronavirus Resource Center above graphs the positivity rate for Indiana as a whole, but not at the county level. However, many decisions about reopening are made at a county level, such as school corporations deciding whether to reopen. Thus it makes sense to look at the positivity rate also at the county level.

What’s a choropleth map?

A choropleth map is one in which each region on a map is colored based on the bucket in which a chosen data value falls. A simple and familiar example is a US presidential election map where each state that went to the Democratic candidate is colored blue and each state that went to the Republican candidate is colored red.

You need three things to create a choropleth map:

  1. Geospatial data for the regions of interest. Usually for each region you’ll need a list of latitude, longitude pairs that describe the polygon or set of polygons that circumscribe the region. In this case, I need the geospatial data for Indiana’s counties.
  2. Some data that will be used to distinguish the regions. I used the positivity rate as a discriminating factor, so I need data at the county level that will tell me the total number of COVID-19 tests and the number of positive tests.
  3. A color scheme to be applied to the regions. I’ll use an online tool, ColorBrewer, to general a color scheme that will highlight those counties that have > 5% positivity, since that’s the crucial cutoff in the WHO recommendation.

Getting Indiana county map data

GeoJSON seems to be the easiest geospatial file format to use with Leaflet.js so I searched for Indiana county map data in GeoJSON format. I found this site, operated by Eric Celeste, that has exactly what I need. I opted for the 20km resolution file, the lowest one, since I don’t need high-resolution data for my purposes.

Adding in the COVID-19 testing data

County level COVID-19 testing data for Indiana is available from the Indiana Data Hub. This dataset has the daily number of COVID-19 tests and the number of positive results for each county.

Each "feature" in a GeoJSON "FeatureCollection" has both a geometry and an arbitrary set of properties. I decided write a Python script that would process the 20km resolution counties GeoJSON file, filter out the non-Indiana counties, and then add the COVID-19 testing data to the properties of each county. I used Pandas’ read_excel to process and extract the testing data in Excel format and create dictionaries of the data that could be added to the properties.

Here’s the code to read the testing data from the Excel file:

def load_covid_19_data(covid_data_excel):
    covid = pd.read_excel(covid_data_excel)
    # Past 14 days starting from yesterday
    past_14_days = [(date.today() - timedelta(days=x)).isoformat() for x in range(1, 15)]
    covid = covid[covid["DATE"].isin(past_14_days)]
    covid_count = covid.pivot(index="LOCATION_ID", columns="DATE", values="COVID_COUNT").to_dict('index')
    covid_deaths = covid.pivot(index="LOCATION_ID", columns="DATE", values="COVID_DEATHS").to_dict('index')
    covid_test = covid.pivot(index="LOCATION_ID", columns="DATE", values="COVID_TEST").to_dict('index')
    return covid_count, covid_deaths, covid_test

And here the data is added to the properties of each feature:

    covid_count, covid_deaths, covid_test = load_covid_19_data(covid_data_response.content)
    for feature in counties_data["features"]:
        fips = int(feature["properties"]["STATE"]) * 1000 + int(feature["properties"]["COUNTY"])
        feature["properties"]["POP"] = pop_data[fips]["POP"]
        feature["properties"]["COVID_DEATHS"] = covid_deaths[fips]
        feature["properties"]["COVID_COUNT"] = covid_count[fips]
        feature["properties"]["COVID_TEST"] = covid_test[fips]

The fips is the FIPS county code, a standard code for each county in the US.

Applying a color scheme using ColorBrewer

For the color scheme I used the ColorBrewer tool. There are several different kinds of color schemes you can use for a choropleth:

  • sequential – the data being visualized is a range of values, for example, population density
  • diverging – the data diverges around a critical value, for example, an annual average temperature anomaly
  • qualitative – for non-quantitative, categorical data, for example, coloring a map based on majority race or ethnicity

In this case, a diverging color scheme is the best fit. The critical value, based on the WHO recommendation I mentioned above, is the 5% positivity rate threshold. I chose a color scheme with two shades of red for above 5% (light red for 5-10%, dark red for 10+%) and two shades of grey for below 5% (light grey for 1-5%, dark grey for < 1%).

In Leaflet.js, when styling each county, the feature’s properties are used to compute the positivity rate and then the corresponding color is looked up for it.

      function getColor(positivity) {
        const index =
          positivity >= 0.1
            ? 0
            : positivity >= 0.05
            ? 1
            : positivity >= 0.01
            ? 2
            : 3;
        // https://colorbrewer2.org/#type=diverging&scheme=RdGy&n=4
        const colors = ["#ca0020", "#f4a582", "#bababa", "#404040"];
        return colors[index];
      }
      function style(feature) {
        return {
          weight: 2,
          opacity: 1,
          color: "white",
          dashArray: "3",
          fillOpacity: 0.7,
          fillColor: getColor(getPositivityRate(feature.properties)),
        };
      }

Resources

I made much use of a Leaflet tutorial on creating choropleth maps, which I encourage checking out if you want to learn more about this type of visualization.

Estimation – The Art of Project Management

At work this week I needed to develop an estimate for a front-end development project. Since creating a full project estimate is not something I do very often I decided to review the chapter on estimation in The Art of Project Management by Scott Berkun, a book I read several years ago. Below are my main takeaways.

Rule of thirds: design, implementation and testing

Scott’s general rule of thumb here is that for every project or task it will take the same amount of time to do the design as it will take to do the implementation and likewise the testing. So if a project will take 2 weeks to implement, then you need to factor in 2 weeks for design and 2 weeks for testing. I think this one is important because when coming up with an estimate it is very easy to focus only on how long it will take to implement. Testing is an aspect that is easy to forget or grossly underestimate when building a project plan. And taking time to carefully design software can save a lot of wasted effort down the road.

Divide and conquer: big schedules are many small schedules

The more a project estimate is broken down into smaller and smaller tasks, with estimates on each task rolled up into the overall estimate, the more accurate it will be. Another important point here: the length of the small schedules should correlate (inversely) to the volatility of the project — more volatile == shorter small schedules. Maybe another way to put this: the more unknowns there are, the smaller the small schedules should be so that the plan can be adapted at each iteration.

Good estimates require good designs and experienced engineers

The quality of designs and the maturity of the engineers are two very important factors that affect the quality of estimates. The main point here isn’t so much that you have to have the best designs and senior engineers to get good estimates but rather understand that estimates are probabilities and the quality of designs and engineers are going to impact those probabilities. A good design, especially up front, may be hard to develop if the project itself is meant as a learning exercise. That’s okay, just recognize that any estimates for the project are going to have a low probability of being hit.

Be optimistic in vision and skeptical in the schedule

Honestly, I’m not sure how to put this in practice, but I like this idea. On many projects the schedule is the only or the main overall description of the project, so it can feel disheartening to build one that is conservative when there is excitement for the possibilities of the project. I think having a vision for the project that is separate from the schedule is a good idea, but I’m not sure I’ve seen that in practice. If they are separate then I think you can apply this advice.

But mainly I’m including this piece of advice because the schedule does need a high degree of critical thought applied to it to make sure it is realistic. And the schedule should not contain all of the hopes and dreams of the project.

Take on risks early

When you look at the sequence of tasks for the project, there may be a part that isn’t needed until 80% through the project. But if that part is for something where there are some unknowns, it makes sense to move it up in the schedule so that any scheduling surprises can be absorbed into the scheduled. For example, if your team hasn’t developed a mobile app before and that’s one of the deliverables, it would make sense to start work on that as soon as possible in the project.

Invest in good design

Build prototypes. Spend time on teasing out those unknowns before coming up with a schedule. Where the specification lacks the necessary detail to give an accurate estimate, ask questions and dig to get answers. The more that can be known up front, the better the estimates.

Conclusion

These were all good reminders for the project I’m estimating at work. The rule of thirds reminds me that time will be needed for testing. This is a second phase of the project, the first phase built a prototype and that does help with having a good design since there is already a prototype as a reference point. There are some risks such as full text search of timestamped transcripts, with deep linking to audio and video, so we’ll likely want to tackle those early in the project. Finally, I appreciated the reminder to ask questions about the specification to get the kind of details that help build a stronger estimate.

Book Review: Third-Party JavaScript

The book Third-Party JavaScript, by authors Ben Vinegar and Anton Kovalyov, describes techniques and tools for creating JavaScript widgets and API libraries that can be loaded into publishers’ websites. Think Google Maps embedded maps on a travel website.

They cover the many different pitfalls with creating a third-party JavaScript widget. First you have to anticipate a potentially hostile environment in which your JavaScript will execute. Some libraries overwrite methods on the prototype of global classes (for example, Array.prototype.toJSON), so you have to program defensively and not assume that these functions will be available or function as normal.

Another challenge is how to communicate between your third-party JavaScript code and your API server. Historically this wasn’t generally possible because of something called the Single Origin Policy which means that scripts can only communicate with the origin of the page in which they were loaded. However, there are many ways to work around this, especially in older browsers. Nowadays, there is good support in modern browsers for CORS, Cross-Origin Resource Sharing, a protocol for making cross-domain requests. This book was published in 2013 and most of the techniques in this book (such as JSONP and subdomain proxies) are probably unnecessary now. Still, it is useful to read about these techniques and understand how they work and why a protocol like CORS was necessary.

Security is a concern for third-party JavaScript as well. The two main types of attacks covered are XSS (cross site scripting) and XSRF (cross site request forgery).

One area that the authors only briefly touch on but which is of interest to myself is that of a user authenticating with a third-party widget. With OAuth2 it should be possible for a third-party widget to redirect the user to a login page and then get an access token that can be used to make requests to a third-party service on the user’s behalf. This would allow embedding the user interface of a third-party service into any other website. For example, for Airavata, we could develop a widget for creating and monitoring computational experiments that other science gateway web applications could embed.

I picked up this book because I want to make the Airavata Django Portal extensible by loading UI plugins created by science gateway developers. In essence, this is the reverse of what Third-Party JavaScript is about — I want the Airavata Django Portal to load and use these third-party extensions. This book has helped me think about the kind of challenges I and those plugin developers will face and how to solve them. For example, instead of UI plugins communicating directly with the Airavata Django Portal REST API (and hence needing to solve that cross-domain issue) they could instead use events dispatched to the first-party UI code which would then make the REST API call on the plugins behalf.

Integrating vue-cli with Django

For the Airavata Django Portal project I recently worked on updating the javascript build scripts from cobbled together Webpack scripts to using vue-cli. There were several advantages to switching to vue-cli:

  • Less idiosyncratic build configuration for the different Django apps. The UI for the Django Portal is broken into several Django apps, each with their own frontend code and with a package of common frontend code. A couple of these were being built in very different ways since they started from very different Webpack templates.
  • Added functionality like integrated linting on save and Hot Module Replacement (HMR). Getting a Vue.js frontend app to build with Webpack is reasonably doable. But adding additional functionality like HMR requires quite a bit of extra work and that work would have to be replicated, with some adjustments, to each Django app. Using vue-cli allows us to get all of the goodies of modern javascript tooling for free.

In this post I’ll recap the issues I ran into and how I solved them. To see the vue-cli configuration that I ended up with, check out the following in one of the Django apps (in this case, the workspace app):

Getting Started

vue-cli has an easy way to create a project from scratch, but I needed to integrate it with existing Vue.js projects. What I did was generate a dummy project in a completely separate folder and then look at what was generated and copy in the necessary bits to the existing Vue.js projects. Here are some things that were different and needed to be copied over:

  • in our old config we were using .babelrc files. vue-cli generates a babel.config.js file (and you don’t want both of them)
  • from the generated package.json file I copied the scripts, devDependencies, the eslintConfig, postcss, and browserslist

webpack-bundle-tracker and django-webpack-loader

There are two basic approaches one could take to integrate the generated Webpack bundles with the backend Django templates:

  1. Generate Webpack bundles with expected file names (so, no cache-busting hashes) the same way for dev and production modes. This way the path to the generated bundle files is known in advance and can be hardcoded in the Django templates. This is what we were doing in Airavata Django Portal before this integration.
  2. Load the Webpack bundles dynamically. That is, figure out what files were generated for a Webpack bundle and load those. Webpack is free to name the files however it needs to; it can even provide URLs to these files if they are dynamically generated as in the case of the dev server.

With the migration to vue-cli I wanted to get the benefits that come with approach #2. To get #2 to work requires generating bundle metadata and a library to load that metadata. Lucky for me those both already exist. webpack-bundle-tracker is a Webpack plugin that will generate a JSON file with the needed bundle metadata and django-webpack-loader is a Django app that provides template tags that can read the bundle metadata and load the appropriate files.

See the linked vue.config.js file above to see how to integrate webpack-bundle-tracker. And see the linked settings.py file above to see how to integrate django-webpack-loader. Once integrated, the bundles can be loaded in the template. See the base.html file above for an example.

To get the bundle loading to work, however, I do need to generate the same set of files in production and development since I need to know which bundles to load in the Django templates. In vue-cli the dev server mode just generates a single javascript file to be loaded but in production mode there are potentially three files generated, one for vendor code, one for common code (if there are multiple entry points) and one for the entry point’s code (and similarly for CSS code). To do this I ran npx vue inspect --mode production and inspected the production chunk configuration:

...
    splitChunks: {
      cacheGroups: {
        vendors: {
          name: 'chunk-vendors',
          test: /[\/]node_modules[\/]/,
          priority: -10,
          chunks: 'initial'
        },
        common: {
          name: 'chunk-common',
          minChunks: 2,
          priority: -20,
          chunks: 'initial',
          reuseExistingChunk: true
        }
      }
    }
...

and then copied this into the appropriate part of the vue.config.js file (see the linked vue.config.js file above).

Local packages

As mentioned above, there are a couple of common packages that the Vue.js frontend code make use of. One is of common UI code and the other is code for making calls to load data from the REST services. These are linked into the Vue.js projects via relative links in the dependencies section of the package.json file:

{
...
  "dependencies": {
...
    "django-airavata-api": "file:../api",
    "django-airavata-common-ui": "file:../../static/common",
...
  },
...
}

For reasons that aren’t entirely clear to me, this caused problems with vue-cli. When running ESLint, for example, vue-cli would complain that it couldn’t find the ESLint config file for these relatively linked packages. I got a similar problem with PostCSS. This comment on issue #2539 gave me the config I needed to force using the project’s ESLint and PostCSS config:

const path = require('path');
module.exports = {
  chainWebpack: config => {
    config.module
      .rule('eslint')
      .use('eslint-loader')
      .tap(options => {
        options.configFile = path.resolve(__dirname, ".eslintrc.js");
        return options;
      })
  },
  css: {
    loaderOptions: {
      postcss: {
        config:{
          path:__dirname
        }
      }
    }
  }
}

Hot Module Replacement

To get HMR working I needed to have the following configuration to allow loading the JS and CSS files from the dev server on a separate port (9000), since I also have the Django server running on localhost on another port (8000):

  devServer: {
    port: 9000,
    headers: {
      "Access-Control-Allow-Origin": "*"
    },
    hot: true,
    hotOnly: true
  }

Other changes

vue-cli doesn’t include the template compiler in the bundle so the entry point cannot include a template string. This meant I needed to change the entry point code to use a render function instead of a template string. For example, instead of

import Vue from 'vue'
import BootstrapVue from 'bootstrap-vue'
import ViewExperimentContainer from './containers/ViewExperimentContainer.vue'

// This is imported globally on the website so no need to include it again in this view
// import 'bootstrap/dist/css/bootstrap.css'
import 'bootstrap-vue/dist/bootstrap-vue.css'

Vue.use(BootstrapVue);

new Vue({
  el: '#view-experiment',
  template: '<view-experiment-container :initial-full-experiment-data="fullExperimentData" :launching="launching"></view-experiment-container>',
  data () {
      return {
          fullExperimentData: null,
          launching: false,
      }
  },
  components: {
      ViewExperimentContainer,
  },
  beforeMount: function () {
      this.fullExperimentData = JSON.parse(this.$el.dataset.fullExperimentData);
      if ('launching' in this.$el.dataset) {
          this.launching = JSON.parse(this.$el.dataset.launching);
      }
  }
})

I needed this essentially equivalent code that uses a render function instead:

import Vue from "vue";
import BootstrapVue from "bootstrap-vue";
import ViewExperimentContainer from "./containers/ViewExperimentContainer.vue";

// This is imported globally on the website so no need to include it again in this view
// import 'bootstrap/dist/css/bootstrap.css'
import "bootstrap-vue/dist/bootstrap-vue.css";

Vue.use(BootstrapVue);

new Vue({
  render(h) {
    return h(ViewExperimentContainer, {
      props: {
        initialFullExperimentData: this.fullExperimentData,
        launching: this.launching
      }
    });
  },
  data() {
    return {
      fullExperimentData: null,
      launching: false
    };
  },
  beforeMount() {
    this.fullExperimentData = JSON.parse(this.$el.dataset.fullExperimentData);
    if ("launching" in this.$el.dataset) {
      this.launching = JSON.parse(this.$el.dataset.launching);
    }
  }
}).$mount("#view-experiment");

One thing I learned in this process is that the vue-template-compiler version needs to be the same as the version of Vue.js, otherwise you get an error like this:

Module build failed (from ./node_modules/vue-loader/lib/index.js):
Error: [vue-loader] vue-template-compiler must be installed as a peer dependency, or a compatible compiler implementation must be passed via options.
    at loadTemplateCompiler (/Users/machrist/Airavata/django/django_airavata_gateway/django_airavata/apps/dataparsers/node_modules/vue-loader/lib/index.js:21:11)
    at Object.module.exports (/Users/machrist/Airavata/django/django_airavata_gateway/django_airavata/apps/dataparsers/node_modules/vue-loader/lib/index.js:65:35)

Just make sure you reference the same version of both as dependencies in package.json.

Conclusion

The dev experience is now better than ever. Just start up the Python server

source venv/bin/activate
python manage.py runserver

Then navigate to the Django app folder and run

npm run serve

Now we have hot module replacement and linting on save.

I think some improvements can still be made. For one, there is still a good bit of boilerplate config that is needed for each Django app. It would be good if it could be shared. Also, I investigated whether there was a webpack-bundle-tracker vue-cli plugin. Turns out there are two, but they don’t quite do what I want. Maybe I’ll make a third one? 🙂

Resources that helped me

How to create a VirtualBox VM with a static IP and internet access

Introduction

Recently I’ve been working on installing Apache Airavata in a VirtualBox VM running on my laptop using our “standalone” Ansible installation settings. The goal is to have a locally running instance of Airavata that I can connect to when developing the Airavata Django Portal which I’ve been working on. That means I need Django running on my laptop to be able to access the VM (host-to-guest access) and the VM does need to be able to access the internet (guest-to-internet access) since the Ansible playbooks that are executed against the VM download and install software from the internet.

It turns out that getting this set up is not so trivial, but also, it’s not that hard once you know what VirtualBox provides and how to configure it. In summary, the approach I’ll give here is to create a VirtualBox VM:

  • with the default NAT network adapter (for internet access)
  • and then add a host-only network adapter and configure the VM with a static IP address (for host-to-guest access)

A quick word about VirtualBox networking modes. You can read all about the various networking modes here but here’s a quick summary:

  • NAT – the networking mode of the default network adapter when you create a new VM. This gives internet access but applications running on the host can’t make network connections to the VM.
  • Bridged – with this mode VirtualBox uses a special driver for the host’s physical network interface to create a virtual network interface for the VM. The VM gets an IP on the same network that the host is physically connected to. Host-to-guest communication and internet access are available.
  • Host-only – with this mode VirtualBox creates a virtual network that the host and the VMs are connected to. This allows host-to-guest communication but this virtual network has no access to the internet.

Now you might be wondering, why not just use a bridged network adapter? Well, you can, but there is one substantial downside. Whenever the network the host is connected to changes, the IP address of the VM will change. This is exacerbated in my case by the fact that I exclusively use wireless networks on my laptop, so my network is regularly changing. Also, I really need a static IP address for the VM to configure the Ansible scripts and because part of the process is to generate a self-signed SSL certificate for the VM’s IP address. But, if you’re using a wired workstation or you don’t have a lot of configuration dependent on the VM’s IP address, bridged networking might be a good solution to get you both internet access and host-to-guest networking.

Installing CentOS 7

Creating a CentOS 7 VM is covered well in other places (I used Jeramy Singleton’s guide), so I won’t cover all of the steps here. But here are some quick pointers:

  • Set the type of the VM to Linux and the version to Red Hat (64-bit)
  • Download a minimal ISO from https://www.centos.org/download/
  • Log in as root and change the working directory to /etc/sysconfig/network-scripts/ and edit the ifcfg-enp0s3 config file and set ONBOOT to yes. Then reboot the VM to get network access.

Also note that whereas in Jeramy Singleton’s instructions he has you create a port forward (2222->22) to be able to SSH into the VM, in the following we’ll add a host-only network instead and use that IP address to SSH into the VM on the standard port 22.

Configuring host-only network

First, make sure that there is a host-only network to connect to. In my case, a default one was already created, called vboxnet0. To check if you already have one, start VirtualBox and then click on the Global Tools button and make sure you are on the Host Manager Network tab.

host-only network details in the Host Network Manager

Take note of the IP Address of the network and the network mask. In the screenshot above, the IP Address is 192.168.99.1 with network mask of 255.255.255.0 which means I can assign IP addresses 192.168.99.2-254 statically. I’ve disabled the DHCP server since I’ll assign IP addresses statically, but in theory you utilize static and dynamic IP assignment (if you do that note that the DHCP server will hand out IP addresses from 100-254 by default, so don’t use those).

Now add a host-only network adapter to the VM. First, make sure that the VM is shut down. Next, in the VirtualBox app select the VM and click on the Settings button. Click on the Network tab. Adapter 1 should be your NAT adapter. Click on the Adapter 2 subtab, select Host-only Adapter and the name of the host-only network (vboxnet0 in this case).

Adding a Host-only adapter to the VM

Click OK and start up the VM. Log in as root through VirtualBox console. Run

$ ip addr

to find the name of the host-only network interface. In my case it was called enp0s8.

$ ip addr

Create a file called ifcfg-enp0s8 in /etc/sysconfig/network-scripts/ and give it the following contents:

DEVICE=enp0s8
BOOTPROTO=static
ONBOOT=yes
IPADDR=192.168.99.10
NETMASK=255.255.255.0

Where NETMASK should match the settings for your host-only network as obtained above and IPADDR should be an available IP address in the host-only network (again, typically in 2-254 range).

Now run

$ systemctl restart network

Now when you run

$ ip addr

you should see the IP address you configured in the ifcfg-enp0s8

“ip addr” shows the IP address for the host-only adapter interface

You should now be able to SSH to the VM from the host OS:

(host OS)
$ ssh root@192.168.99.10

You can now connect applications running on the host OS to network services running on the VM via the host-only network and the VM can also connect to the wider internet via the NAT interface.

Resources

Dynamically including Django apps using entry points

For the Airavata Django Portal project I’ve been looking at how third-party contributors could contribute Django apps that would integrate nicely with the portal. This is not something that Django has built-in support for, as can be seen in Django ticket #29554, but people have come up with workarounds.

The most compelling workaround I found was discussed on the django-developers mailing list and is implemented by the pretix open source application. One clever thing they are doing is using python packaging entry points:
https://packaging.python.org/specifications/entry-points/. The entry points can be dynamically introspected, for example pretix iterates over pretix.plugin entry points in its settings.py.

This can be used in the setup.py of a Django app to register its AppConfig. A Django project can introspect any such Django apps that installed in the current virtual environment and add all of these to the INSTALLED_APPS in settings.py, just like pretix above.

The other things to configure when adding a Django app are to add the app’s urls to the project’s urls.py. Again we can loop over all Django app entry points and get their AppConfig. We can either allow these apps to specify what URL prefix they want, as a property on the AppConfig, or we can just assign a URL for these apps with a common prefix of plugins/ then the app’s label (which must be unique). The urls module of the Django app can be figure out if you have an instance of its AppConfig:

from importlib import import_module
# where app is an AppConfig instance retrieved from django.apps
urls = import_module(".urls", app.name)

In the case of the Airavata Django Portal I want to know a bit more about the apps in order to integrate them into the overall navigation. The following are properties that can be specified on the AppConfig:

  • url_home: This is the home URL of this app. I could default it to just the first URL pattern of the app:
from importlib import import_module
urls = import_module(".urls", app.name)
url_home = urls.app_name + ":" + urls.urlpatterns[0].name
  • app_order: the desired order of the app in the listing. Could default to last if not specified
  • fa_icon_class: FontAwesome icon class to use for this app. Could default to something generic
  • app_description: a description of the app. Could default to just the verbose_name of the app

As indicated in the list above, all of these extra bits of metadata should be optional and be provided as needed.

There’s still the issue of sub-menu items that need to be integrated. Currently apps should inherit from the base.html template and add sub-menu items into a navigation items block that appears on the left side of the portal page. This could perhaps be better implemented as AppConfig metadata.

Speeding up SSH by Reusing Connections

From https://puppet.com/blog/speed-up-ssh-by-reusing-connections:

One way to enable this feature is to add the following to your ~/.ssh/config:

  Host *
      ControlMaster auto
      ControlPath ~/.ssh/sockets/%r@%h-%p
      ControlPersist 600
  

In a quick test with a particular host running ssh user@host whoami takes about 0.8s without that setting and takes about 0.1s with the setting above. Really speeds up bash-completion with scp.

Ajax file upload with fetch and FormData

Uploading files using an Ajax request is easier than ever with a couple of fairly recent additional web APIs, fetch and FormData. I’ll show how to combine these two APIs to upload files using an Ajax request.

If you’re like me you probably have heard of fetch. It is basically a nicer API for creating and dealing with XMLHttpRequests. I’ve only briefly encountered FormData until recently when I worked on the file upload for the upcoming Airavata Django portal. FormData provides an interface for adding key/value pairs as would be submitted by a web form, but it can also handle files that the user has selected to upload.

So let’s say you have an <input id="profile-pic" type="file"></input> element in your page and you want to use Ajax to upload the file when selected by the user. You can upload the file like so

let profilePic = document.querySelector('#profile-pic');
let data = new FormData();
data.append('file', profilePic.value);
let uploadRequest = fetch('/profile/picture-upload', {
    method: 'post',
    body: data,
})
    .then(response => response.json())
    // here you would handle success response and error cases

You can also post additional non-file values, just like in an HTML form. So for example you could do the following:

let profilePic = document.querySelector('#profile-pic');
let data = new FormData();
data.append('file', profilePic.value);
data.append('user-id', userId);
let uploadRequest = fetch('/profile/picture-upload', {
    method: 'post',
    body: data,
})
    .then(response => response.json())
    // here you would handle success response and error cases

fetch automatically chooses the right content-type to use when submitting the request based on the kind of data in the FormData object. As you might know, when you have a form that uploads files you need to set the enctype attribute on the form to multipart/form-data which encodes the form values as multipart MIME parts. fetch applies this encoding and sets the content-type to multipart/form-data, so there is no need to specify it

For Contributors: Managing a fork and keeping it up to date

Let’s say you have forked a repository on GitHub and you’ve started working on a feature or a bug fix that you plan on contributing as a pull request at some point. One issue you’ll run into eventually is how to keep your fork up to date with the upstream repository. Here are some instructions I’ve followed to manage a fork and keep it up to date.

First of all, create a new branch on which to make all of your commits. Theoretically, if you only ever plan on contributing one pull request, you can get away with adding the commits to the main branch (e.g., master). However, it makes it harder to contribute multiple pull requests and it makes it harder to keep that main branch up to date.

Create and switch to a new branch. For the following examples I’ll assume I’ve forked the django repo.

git clone https://github.com/machristie/django.git
cd django
git checkout -b my-branch

After you make some commits and are ready to push them to your fork, do the following:

git push -u origin my-branch

The -u option to git push means to set this branch (my-branch) to track this remote branch (origin/my-branch) as its upstream branch. What this means is that from here on you can simply run git push or git pull and git will push/pull to this remote branch (origin/my-branch). Just to clarify here origin is your fork.

Second, now that you are doing all of your work off the main branches, set the main branches to track the remote branches in the upstream repo. Then you can easily do a git pull to bring your local main branch up to date.

Let’s add the upstream repo as a Git remote.

git remote add upstream https://github.com/django/django.git
git fetch upstream

Now let’s set the master branch to track the remote branch in this upstream repo.

git checkout master
git branch --set-upstream-to=upstream/master

Now we can do a git pull

git pull

The main branch(es) now are set up to sync with the upstream repo while the branches you create are set up to sync with your fork.

By the way, if you want to update a main branch in your forked repository you can do that too. For example, to update the master branch in your fork to bring it up to date with the master branch in the upstream repository you would switch to your master branch, update it with upstream, then push those updates to your fork:

git checkout master
git pull
git push origin master

At some point you’ll want to update your branch so it has the most recent commits from the main branch. For example, let’s say you create my-branch off of the master branch and now you want to update your my-branch with the latest commits on master that have landed in the upstream repository in the meantime. To do this you can first pull in updates for master from the upstream repo and then rebase your branch with master. Here’s how:

git checkout master
git pull
git checkout my-branch
git rebase master

git rebase master rewrites your commits on your branch on top of the latest commits on master.

Of course, when you do this you might run into merge conflicts. When you run git rebase master it will try to re-apply all of your commits, one by one, on top of the last commit on master. If there are changes on master and also on your branch to the same lines of code in a file, git won’t be able to figure out how to automatically merge those changes. The rebase will stop and tell you that there are merge conflicts. Running git status will contain a section called Unmerged paths, something like the following:

Unmerged paths:
  (use "git add <file>..." to mark resolution)

    both modified:      somefile.txt

For each one of the files listed in Unmerged paths:
1. Open the file in a text editor and inspect the conflicting changes. The conflicts are delimited by <<<<<<<, ======= and >>>>>>> markers.
2. Decide which side to keep or manually merge the changes, as needed. Save the file.
3. Run git add path/to/file

Once you’ve resolved all of the merge conflicts, run:

git rebase --continue

Git will continue with the rebase as best it can. It may stop the rebase process multiple times if there are more merge conflicts.

For more information on resolving merge conflicts, see the section on Basic Merging in the Pro Git book.