Some Apache projects, such as Apache Airavata just recently, have made their GitHub repos writeable. However, to actually push to an Apache GitHub repo you need to enable two-factor authentication (2FA) in GitHub. With 2FA some additional work is needed to authenticate with GitHub from a Git client.
First Steps
First thing you need to do is link your Apache account with your GitHub account and enable 2FA on GitHub if you haven’t already done that. Go to https://gitbox.apache.org/setup/ and follow the instructions there.
Using a Personal Access Token
Now that you have 2FA enabled on your GitHub account you can no longer use your GitHub username and password to authenticate with GitHub from a Git client. Instead of your GitHub password you can use a Personal Access Token.
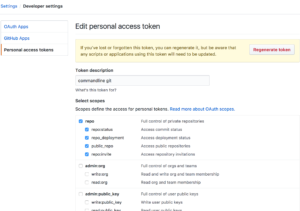
- Generate a Personal Access Token in Github.
- Give it a name.
- Check the repo scope.
- Create the token and copy it. (make sure to securely save this token somewhere, you’ll won’t be able to get it back later)
- When doing
git pushprovide the GitHub username and this personal access token.
Also, you’ll want to store this personal access token in a keychain type service so you don’t have to provide it each time you do a push. If you haven’t already done so, configure a credential helper for Git.
Using an SSH Key
Alternatively, you can set up an SSH key for authenticating with GitHub. I didn’t do this but Suresh reported that this works as well.
See GitHub’s documentation on working with SSH keys for more information about this approach. The gist of it is that you can use an SSH key you already have or you’ll need to generate a new one. Then you’ll need to add the public key portion to GitHub. Finally, GitHub has some instructions on how you can automatically add your private key passphrase to your ssh-agent so you don’t need to ever type your private key passphrase.